Quick Walkthrough: Keil MDK

As an Electronics and Communications undergrad, I am deeply interested in the design of embedded systems in programmable logic, robotics and problem-solving. These domains excite me and drive my passion for learning and creating innovative solutions.
Keil MDK includes the following key features:
µVision Integrated Development Environment (IDE)
ARM Compilation Tools, including C/C++ Compiler, Assembler, Linker, and utilities
Debugger
Simulator
RTX Real-Time OS Kernel
Reference startup code for thousands of microcontrollers
Flash programming algorithms
Program examples
Here is a brief guide for getting started with the IDE.
Pack Installation
The Keil Pack installer is integrated into the Keil MDK and can manage software components for various microcontroller architectures.
To install a pack in Keil MDK:
Open the Pack Installer by selecting Pack Installer from the Pack Manager menu or by clicking the Install Pack button in the Pack Manager window.
Select the pack you want to install from the list of available packages. You can filter the list by vendor, device, or pack type using the drop-down menus at the top of the window.

Click the Install button. The pack will be downloaded and installed on your computer.
If the pack includes device-specific header files or startup code, you will need to specify the location of these files in your project. To do this, select the pack in the Pack Manager window, click the Options button, and set the path to the header files and startup code in the Pack Options dialogue.
You can now use the functions and data types provided by the pack in your project.
Creating and building a new project
From the main menu, select Project > New MicroVision Project.
In the New Project Wizard, please enter a name for the project and select a location to save it.
Select the microcontroller that you will be using in the project.
Select the device vendor and the specific device from the drop-down lists. The pack must be installed if you cannot find your device here.

Click ok to create the project.
A window to add CMSIS may come up. Refer to the "Adding boilerplate" section for the necessary software components.
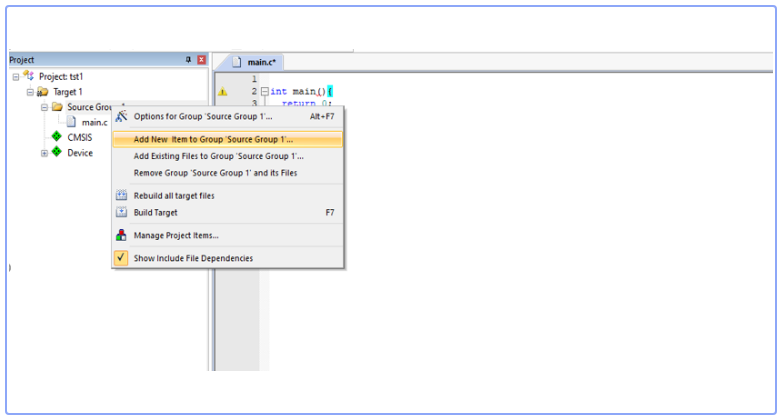
The project will be created. You can add additional source files by right-clicking on the project in the Project Workspace pane and selecting Add New Item. Below, I have added a main.c source file to the Source Group folder.
Once you have added all the necessary source files, you can build the project by clicking the Build button in the toolbar or selecting Build from the Project menu.
After the project has been built, you can use the debugger to test and debug your code. To start the debugger, click the Debug button in the toolbar or select Debug from the Project menu.
Adding boilerplate: CMSIS-CORE and Device-Startup
CMSIS is a set of libraries and header files that provide a standardized interface for accessing the hardware of ARM Cortex-M microcontrollers.
CMSIS-CORE defines the application programming interface (API) for the Cortex-M processor core and its peripherals and includes consistent system startup code. The CMSIS-CORE and Device-Startup software components are sufficient for creating and running applications on the native processor that utilize exceptions, interrupts, and device peripherals. These components will be common to almost all applications we develop in this series.
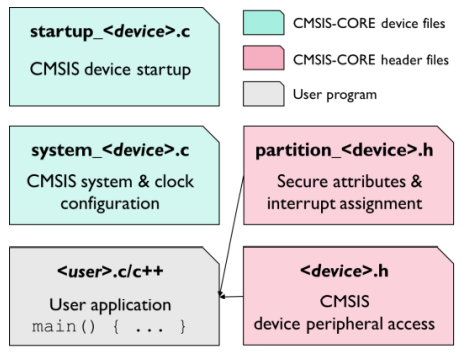
To develop a native Cortex-M application with CMSIS, we use the ::CMSIS:CORE software component together with the ::Device: Startup component. These components provide the following important files: a startup_<device>.s file with reset handler and exception vectors, a system_<device>.c configuration file for basic device setup, and a <device>.h header file for access to the microcontroller device in user code.

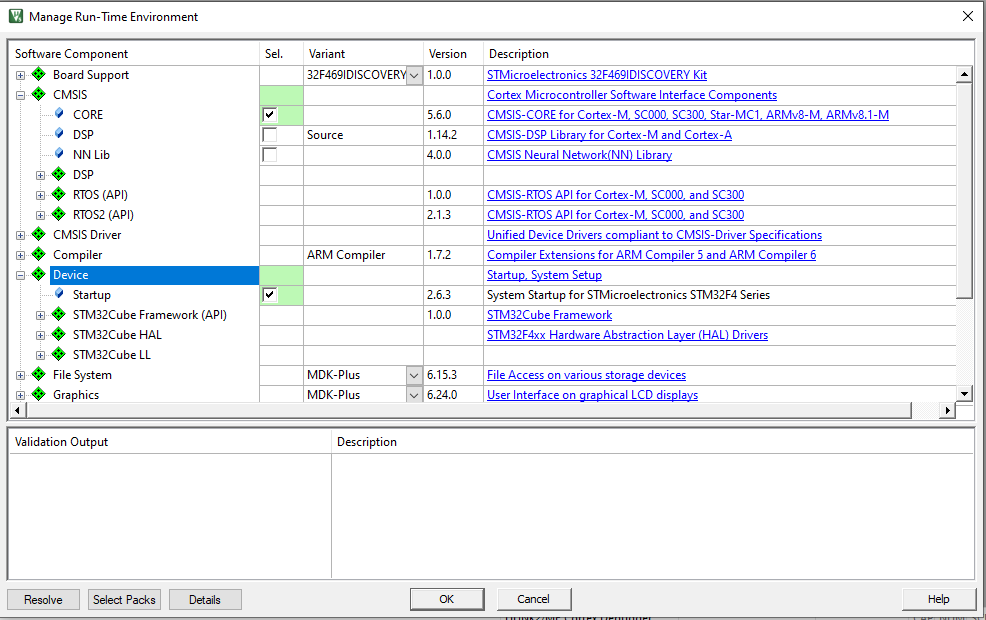
The files for the components ::CMSIS:CORE and ::Device:Startup are added to a project using the µVision dialogue Manage Run-Time Environment. Just select the software components as shown below.
Debugging
To debug your code using Keil MDK, you must set up a debug configuration for your project. This includes selecting the debugging tool (simulator or hardware debugger) and the target microcontroller. You can start the Keil MDK IDE debugger and begin debugging your code.
To set up a debug configuration in Keil MDK, follow these steps:
In the Project Workspace pane, right-click on your project and select "Options for Target" from the context menu.
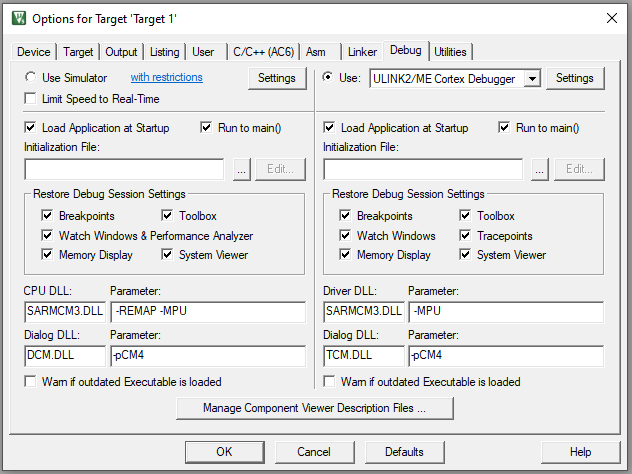
In the Options for Target dialogue, select the "Debug" tab.
In the Debug tab, select the debugging tool you want to use from the "Debugger" drop-down menu. This could be the simulator or a hardware debugger, such as ULINK.
If you are using a hardware debugger, you will also need to select the target microcontroller and specify the connection settings.
Click "OK" to save your debug configuration.
You can start the debugger by clicking on the "Debug" button in the Keil MDK IDE. The debugger will load your code, and you can begin debugging by setting breakpoints, stepping through code, and inspecting variables and memory.
Further reading
For more detailed information about Keil IDE and its features, refer to the Keil MDK documentation.
Note: If you are using ST-LINK debugger and under the utilities tab you get "No ST-LINK detected", then you need to install the driver from STM32.


